The story
Recently, i was working on my home office while the weather was quite a little bit unsettled. Cloudy and sunny phases where alternating each other quite often.
Since a couple of month i have several Philips Hue based lights installed ad my home office so i catched my iPhone and changed the scene according to the actual brightness situation.
After two hours and various szene changes i was really bugged so i decided it´s time to have a automated brightness dependent hue control installation.
The general setting
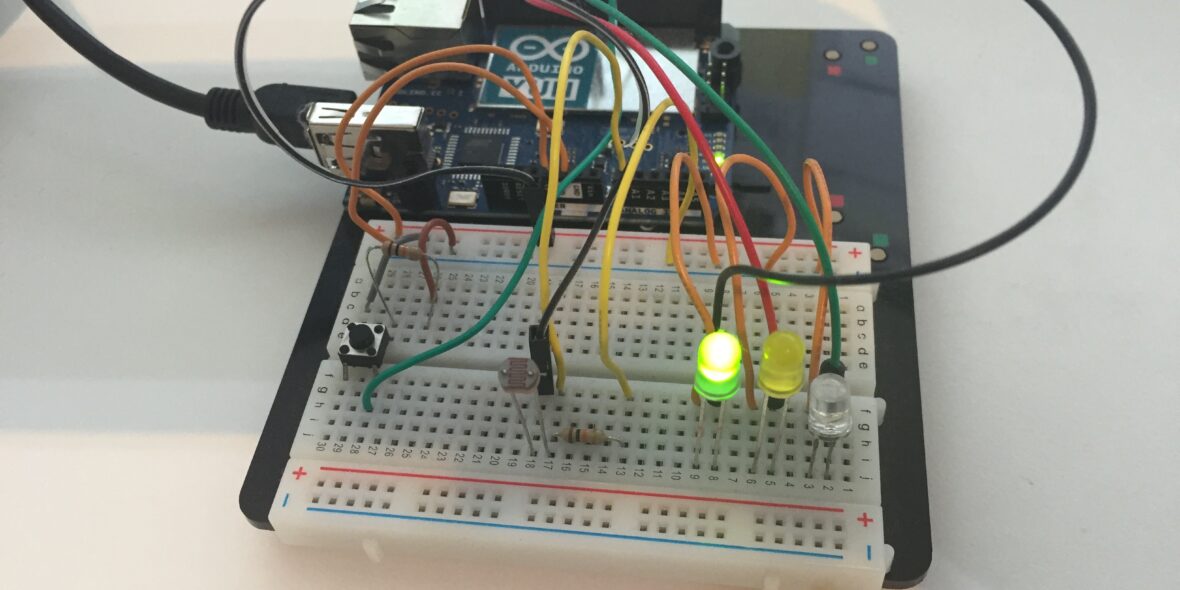
The overall system consists of a philips hue installation, a arduino yun with a breadboard and a little ciruit and some nodejs code.
Philips Hue
The Philips Hue system provides LED lamps with ability to mix up you own color for each lamp. Communication is done by using ZigBee Light Link radio communication protocol. A central gateway is connected with the local wireless lan network.
Most interesting for makers, philips hue has a full featured REST-API where anyone can program against.
More information about the philips hue system can be found here: Philips Hue
Arduino Yun
The Arduino Yun is a special variant of Arduino boards. Beside the normal Atmel 16 Bit controller, the Yun combines the the microcontroller with a small 32 bit chip which hosts a OpenWRT based 32 Bit linux system,. OpenWRT is often used within routers which normally have limited capacity but need for a 32 bit linux system.

More information about the Yun can be found at the official Arduino Website.
The communication between the original arduino atmel controller and the OpenWRT system is done by a bridge. This bridge will be realized on atmel side by a small library and on OpenWRT side by a REST API.
Therefore, it is possible to directly communicate from anywhere within the local network with the atmel microcontroller.
In my installation,calling this url http://192.168.XX.XX/arduino/brightness from anywhere within my lokal network returns me the brightness state.
Because the Arduino Yun comes with onboard WLAN, it is quite easy to connect the Yun with the local network.
The circuit
The circuit is quite simple. A photoresistor for brightness detection, three LEDs (green, yellow, red) to show the brightness state and a button to activate and deactivate the brightness detection. The layout has been done with the great tool from fritzing.org.

The arduino code
The complete code has been published at github under open source licence: Source Code at github. For better maintenance it has been split up into several files. Each file represents a special function.
The main file organize the setup function and the loop function, the main program loop.
Within the loop, the following steps will be performed:
- read photocell raw value
- check the value with the defined limits for low, middle and high brightness
- check for a defined jitter to avoid fast state switching at value changes around the limits
- set the new brightness tate
- check if a request over the Yun bridge has been received
- respond the brightness state or inactive, according to the current setting
- check if the button has been pressed, if yes, change the state
- wait 100ms
The complete code looks like this:
/* This code was inspired by the example code of adafruit.com */
/**
Copyright (C) 2015 Lyn Matten
Open Source: Apache Licence 2.0
All Rights reserved
**/

#include <Bridge.h>
#include <YunServer.h>
#include <YunClient.h>
#include "config.h"


void setup(void) {
  // We'll send debugging information via the Serial monitor
  Serial.begin(9600);
  pinMode(lowPin, OUTPUT);
  pinMode(mediumPin, OUTPUT);
  pinMode(highPin, OUTPUT);
  pinMode(button, INPUT);

  digitalWrite(LEDpin, LOW);

  Bridge.begin();

  for(count = 0; count < 3; count++) {

    Serial.println(count);

   digitalWrite(lowPin, HIGH);
   digitalWrite(mediumPin, HIGH);
   digitalWrite(highPin, HIGH);

   delay(100);

   digitalWrite(lowPin, LOW);
   digitalWrite(mediumPin, LOW);
   digitalWrite(highPin, LOW);

   delay(100);

   server.listenOnLocalhost();
   server.begin();

  }


}

void loop(void) {

  int oldValue = rawValue;

   rawValue = analogRead(photocellPin);

   checkStateForPhotoCell(oldValue, rawValue);

  YunClient client = server.accept();

  if(client) {
    process(client);
    client.stop();
  }

  checkButtonState();


  delay(100);
}


/***************/
void checkStateForPhotoCell(int oldV, int newV) {
/***************/

   if(active == 1)
  {

    int actualState = brightnessState;
    int newState = 0;

    if(checkJitter(oldV, newV) == 0) {
       return;
    }

    //int tick = timer.checkTime();
    int performChange = 1;
/*
    if(tick == -1) {

      timer.start();
      performChange = 1;

    }
    else {

      Serial.print("tick: ");
      Serial.println(tick);

      if(tick >= delayTime) {

         timer.stop();
        performChange = 1;

      }


    }

    */


    if(performChange == 1) {

         if(rawValue < lowLimit)
            {
              //low light
              newState = lowBrightness;

            }
            else if(rawValue >= lowLimit && rawValue < highLimit)
            {
              // normal light
               newState = mediumBrightness;
            }
            else if(rawValue >= highLimit)
            {
              // brigt light
               newState = highBrightness;
            }

            brightnessState = newState;

          setLEDState();


          }


    }


}


int checkJitter(int oldVal, int newVal) {

  Serial.print("oldVal: ");
  Serial.print(oldVal);
  Serial.print("  -- newVal: ");
  Serial.println(newVal);


  if(newVal >= lowLimit && newVal < highLimit) {
    /** check if too much medium **/
    //Serial.println("newVal >= lowLimit && newVal < highLimit");

    /** check to which limit newVal is closer **/
    int diff = highLimit - lowLimit;

    if((newVal - lowLimit) < (highLimit - newVal) ) {
      //closer to low Limit
      //Serial.println("closer to low");
      if((newVal - lowLimit) > jitter) {
      return 1;
      }
    }
    else {
      if((highLimit- newVal) > jitter) {
        //Serial.println("closer to high");
      return 1;
      }

    }


  }
  else if(newVal < lowLimit) {
    /* check if too much low */

    //Serial.println("newVal < lowLimit");
    if((lowLimit - newVal) > jitter) {
      return 1;
    }

  }
  else if(newVal >= highLimit) {

    /** check if too much high **/
    //Serial.print("newVal - highLimit) > jitter: ");
    //Serial.println((newVal - highLimit) > jitter);
    if((newVal - highLimit) > jitter) {
      return 1;
    }

  }


 return 0;


}


/***************/
void checkButtonState() {
/***************/


  // read button state
  buttonState = digitalRead(button);

  if(buttonState == HIGH) {

    Serial.println("ON");
    if(active == 0) {
      active = 1;
      setLEDState();
    }
    else {
      Serial.println("OFF");
      active = 0;

      //switch all leds off
       digitalWrite(lowPin, LOW);
       digitalWrite(mediumPin, LOW);
       digitalWrite(highPin, LOW);

    }
    //delay 1 s to give enough time to release the button
    delay(1000);

  }
  else {
    //Serial.println("OFF");
  }


}


/***************/
void process(YunClient client) {
/***************/


  String retStr = "N.N.";

  if (active == 0 ) {

    client.println("not active");
  }

  else {

    String command = client.readStringUntil('\r');
    Serial.println(command);

    if (command == "brightness") {

      if(brightnessState == lowBrightness) {

          retStr = "LOW";

      }
      else if(brightnessState == mediumBrightness) {

         retStr = "MEDIUM";
      }
      else if(brightnessState == highBrightness) {
         retStr = "HIGH";

      }

      client.println(retStr);
    }
    else {

      client.println("wrong url");
    }
  }


}

void setLEDState() {


       // switch all LEDs off
       digitalWrite(lowPin, LOW);
       digitalWrite(mediumPin, LOW);
       digitalWrite(highPin, LOW);

      Serial.print("BrightnessState: ");
      Serial.println(brightnessState);

      if(brightnessState == lowBrightness)
      {
        //low light
        digitalWrite(lowPin, HIGH);
      }
      else if(brightnessState == mediumBrightness)
      {
        // normal light
        digitalWrite(mediumPin, HIGH);
      }
      else if(brightnessState == highBrightness)
      {
        // brigt light
        digitalWrite(highPin, HIGH);
      }


}

/********* config.h ****************/


/** Variables **/

int photocellPin = 0;     // the cell and 10K pulldown are connected to a0

int LEDpin = 11;          // connect Red LED to pin 11 (PWM pin)
int mediumPin = 12;
int lowPin = 9;
int highPin = 10;
       //
int rawValue = 0; //raw analog value
int brightnessState = 1;

int button = 8;
int buttonState = 0;

int active = 0;

int count = 0;

int lowLimit = 700;
int highLimit = 830;

int delayTime = 20;
int jitter = 20;

YunServer server;

/** Structs **/

typedef enum  {

  lowBrightness = 1,
  mediumBrightness,
  highBrightness

} EnumBrightnessState;

EnumBrightnessState BRState;
The Yun code
for simple passing of the REST calls, no extra code is necessary. It is only needed to have a path on the sd card created:
/mnt/sd/arduino/www/
The rest will be automatically done by the Yun bridge library. For more details please read the Bridge Library Manual.
the nodejs code
To control the philips hue api i choose a api wrapper for nodejs: The node-hue-api by Peter Murray. It provides a simple and comforable wrapper for nodejs to interact with the rest api of the hue gateway.
The complete source code can be found at Github.
The setup is quite simple:
- Detecting the philips hue api
- if detected start timer to call main function – if not detected quit program
- Within the main function, the brightness state from Arduino Yun will be read. The states can be LOW, MEDUM and HIGH. According to the states, the scene will be activated by using the api call method and the scene id. For convenience a small console message will be printed.
The complete code looks like this:
var http = require('http');
var Hue = require("node-hue-api");
var HueApi = require("node-hue-api").HueApi;
var lightState = Hue.lightState;
var q = require('q');
var moment = require('moment');

var config = require('./config.js');


var url ='http://' + config.Yun.ip + config.Yun.path;


var hostname = "IPADDRESS",
    username = config.Hue.username,
    newUserName = null,
    api,
    userDescription = config.Hue.userDescription,
    state,
    stateOn,
    stateOff,
    scenePrefix = config.Hue.scenePrefix,
    timeout = null,
    port = null;


var hueTimer = 0;
var hueState = "not active";

state = lightState.create();
stateOn = lightState.create().on().white(400,100);
stateOff = lightState.create().off();


var displayBridges = function(bridge) {
    console.log("Hue Bridges Found: " + JSON.stringify(bridge));
};

var displayResult = function(result) {
    console.log(JSON.stringify(result, null, 2));
};
var displayResults = function(result) {
    console.log(JSON.stringify(result, null, 2));
};

var displayUserResult = function(result) {
    console.log("Created user: " + JSON.stringify(result));
};

var displayError = function(err) {
    console.log(err);
};


var getBrightness = function() {

    var req = http.get(url, function(res) {

        res.setEncoding('utf8');
        res.on('data', function (chunk) {
            //console.log('BODY: ' + chunk);

            checkHueStateBrightness(chunk);


        });

    }).on('error', function(err) {
        console.log(err);
    });


};


var checkHueStateBrightness = function(state) {

    //console.log("state: " + state.trim());
    //console.log("hueState: " + hueState);

    switch(state.trim()) {

        case "LOW":
            //scene sky


            if(hueState != "LOW") {


                console.log("activate scene sky.");
                api.activateScene("507021e6c-on-0")
                    .then(displayResults)
                    .done();
                hueState = "LOW";
            }


            break;

        case "MEDIUM":
            //scene computer Arbeit

            if (hueState != "MEDIUM") {


                console.log("activate scene Computer Arbeit.");
                api.activateScene("197bac2ca-on-0")
                    .then(displayResults)
                    .done();


                hueState = "MEDIUM";

            }


            break;

        case "HIGH":

            //set off

            if(hueState != "HIGH") {

                console.log("disable Hue lights.");
                api.setGroupLightState(0, stateOff)
                    .then(displayResult)
                    .done();

                hueState = "HIGH";
            }


            break;

        default:

            //not active
            console.log("brightness detection not enabled.");
            hueState = "not active";

            break;

    }

};


/*****************/
//Start Programm
/****************/

Hue.nupnpSearch().then(function(result) {


    hostname = result[0].ipaddress;

    if(hostname == undefined) {
        throw new Error ("cannot find Hue Gateway");
    }
    else {
        console.log("detected hue gateway at " + hostname);
        api = new HueApi(hostname, username, timeout, port, scenePrefix);
        //api = new HueApi(hostname, username);

        var interval = setInterval(getBrightness, 2000);
    }


}).catch(function(err) {

    console.log(err);
})
.done();


/******************/
Result
It was just a little project, born out of a special situation. But now i don´t have to care about brightness and switching on and of my lights. For me, this is the smart in smart home.
Next Steps
Currently, i´m working on a extension of my project. I bought some iBeacons and working on a small iPhone App to automatically send the proximity state to an REST API. If the proximity indicates, that i´m in my office, the brightness program will be activated. If not, a timer will be raised which will disable the lights after a certain time period.